Wednesday, September 18, 2013

High Tea and sorts...

MOMS & DAUGHTERS OF ALL AGES:
We are planning a very fun High Tea group photoshoot! This is something very different and new to us, so we are soooo excited to get to work.


Here's how it works:
There is a limit of 5 pairs (10 people in total)
Each pair contributes R150-00
We set up and provide eats, props and the location

We will have 2 wonderful and excited photographers there ready to take pictures.

There will be lots of group shots and plenty individual shots of each pair.

After the shoot we will go and edit all the beautiful photographs and upload them to Facebook and a personalised dropbox folder for you to have UNLIMITED access to!

You can take, keep and print as many of the photo's as you want! They are all yours! 

Make sure you book your spot now, as like i said earlier, spots are limited!

And don't worry if you haven't had a photo shoot before, we will be there to guide you all the way! And don't for get to enjoy yourself! 

Here are some of the pics you can expect to see: 


Friday, September 6, 2013

Product Photography tips


Get Lots of Light
Natural light works best for any type of photo and should be used whenever possible. Typically, shooting your photos during the day will grant the best results. What matters is not only the quantity of the light, but the uniformity of distribution as well.
Hard shadow vs. soft shadow- Hard shadows are created when the size of the light source is small compared to the size of the subject. Conversely, soft shadows are created when the size of the light source is larger than the subject. For your needs you want to aim for soft shadow.
As demonstrated in the example below, the more diffused the light is, the better its spread on the object you photograph and the more smooth and whole its appearance.  To avoid a hard shadow, use a flash diffuser. A flash diffuser can be created by taking a white tape or a white plastic bag and attaching it to the flash of the camera. In turn, the light will be distributed in a softer, more even way in all parts of the object, rather than be centered in one spot.


White Background – Create the Infinity Curve
Often in product photography, a clean white background looks best since it creates a focus on the object itself. The “Infinity Curve” enables photographers to shoot products against an endless white background that reveals no horizon in the back, only a clean and pleasant view. To create this type of background, place a piece of white paper or fabric and bend it to create a curve. Your product will be the center of the photo and the only item to capture the viewer’s attention.

Find the Unusual Point of View

No one knows your products better than you. However, nothing is better than a product photo shoot to bring out special features of your product that may surprise even you. As you take photos, go for unusual angles, get close ups and look for unique points of view. Tell a story with the images you capture, while you accentuate particular angles. You never know what angle will end up revealing the most impressive or attractive tale, so test different options.

Use a Tripod and a Timer

As you take a picture, even the slightest vibration or movement can cause motion blur. Moreover, the closer you get to an object the more obvious the motion blur becomes. A tripod will assure you remain stable as you take the photo. Even an inexpensive tripod will make a big difference in the sharpness of your images. Additionally, you can use the camera’s built-in timer to minimize camera shake and maximize accuracy.

Sense of Scale

Some products may not be easily recognizable by viewers. This is where giving a sense of scale can be very helpful. If you include an item in the image that people are familiar with, it can really help to visualize the size of the product. For example, if the product is a miniature doll, you could place an object like a standard sized pencil next to it, and give people a sense of scale.

Show the Product in its Natural Environment

Take pictures of your product next to an item that will help people relate to it in real life. Moreover, the use of props can help to bring out certain features in the photo. For example, if you take a picture of a watch, show it on someone’s wrist. If you are selling a coffee table book, take a shot of the opened book on an actual table with a small fruit bowl next to it. If you are selling jewelry or clothing, having at least one picture of your product on a model is great. Potential buyers will get an idea of how the item will look on them and also, it could show the type of target audience you’re aiming for.

We Sell this Shirt in Red, Green and Grey

You may offer a particular item in a selection of colors. In this case, don’t spare any visual details, bare it all in the photo! On many site images, people display a single item and then write under it “also available in blue and green”. A set of photos showing the variety of colors will make the product look richer and more attractive. Don’t just tell them about it, let people see for themselves.

Don’t Delete from Camera

Don’t get tempted to make quick verdicts about your pictures when you review them on the camera. Be patient and wait until you download the photos to your computer. Images look very different on a bigger screen and this is the way to decide which photos make the cut and which will move on to photo-heaven.

Taking a Detailed Photo? Use the “Flower” Setting

Most cameras have a “close-up” setting that you switch it to when you are taking a closer than standard photo. The “flower” setting is really called “Macro” and it appears on most cameras as a tulip-like icon. This is often used when your subject is a small item like a piece of jewelry or a flower. The result is a narrow depth of field and a different perspective.

Pro tip- If you’d like to take a picture of something very small, and even the “macro” feature is not enough, use an extension tube – it gives a focus for the tiny details. The extension tube is typically a tool used by photography pros but as you advance with your photo shoots you may find yourself developing an appetite for advanced tools and other photo instruments.

Editing Is Important

Taking a shot is often just the beginning, next comes the editing and the touch ups. As you prepare images for your site, make sure they are approximately the same size. Choose 1-3 different sizes from large to medium and small. Edit your photos to fit one of the pre-selected sizes so that you won’t have too much variation.
You don’t have to be a web designer or even computer savvy for this one, just upload your pictures into any photo editing software, and get to business. Things like cropping and color correction can make a world of difference in a photo

Tuesday, September 3, 2013

Just incase you didn't know...

We do anything an everything design... 
Pop us a mail on kayleigh_zettler@hotmail.com


5 Tips for photographing your home...


So you have a house you’re proud of and would love to share on online but you find yourself putting it off because… A. You don’t have a nice camera or a photo editing system. B. There are homes out there that are much prettier than yours. C. It’s usually not that clean and you don’t want to feel like a phony. D. (insert your excuse here).


Here are five tips that have helped me take better photos of my own home and given me the confidence to share them online.
Tip #1 One room at a time.
If you want to share these photos as a house tour you’re probably going to want to tidy up any space that is going to be photographed. Think of it as the equivalent to taking family portraits. Sure, your home probably doesn’t stay that clean all the time but you wouldn’t show up to a portrait studio wearing your yoga pants and yesterday’s make-up.
Kids, pets, or messy roommates may thwart your plans to keep your place spotless for more than twenty minutes so I suggest photographing one room, or even one wall, at a time. If your studio is a dump but you want to showcase your favorite corner, de-clutter and style it to your heart’s content. You may even keep it that way!
We usually spread house tour photos out between two or three consecutive afternoons. It helps us feel less overwhelmed and works better with our family’s schedule. It’s also a short enough time frame that nothing gets rearranged.

Tip #2: Look at your home through your lens.
Make a list of all the spaces you want to photograph. As you go through your home, casually take a photograph of the space you want to feature and then see how it looks in your camera.
Do you like the composition of things? Would a vertical shot look better than a horizontal shot? Are there cords poking out of things that might distract from the rest of the shot? Do you need to edit any clutter?
Looking through your camera may help you to notice these things and change them before you take photos. Once I’m happy with the set up of things and have moved the hand weights from under the sideboard, etc., I like to experiment with angles and distances. Just like taking self-portraits or outfit photos, you may have to take a lot before you find the most flattering one.

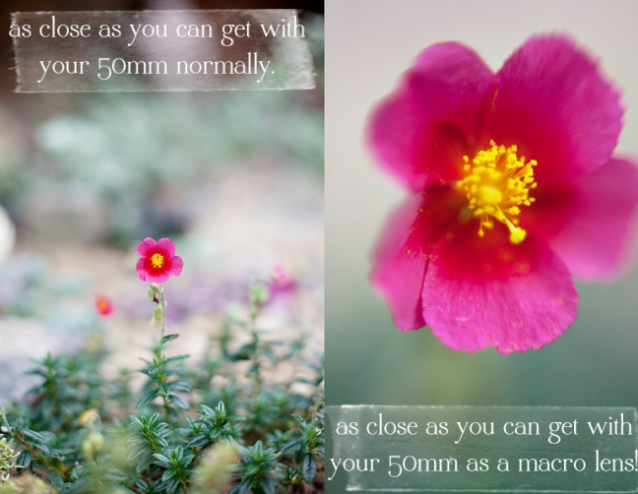
Tip #3 Shoot in natural light.
If your studio has giant windows but they don’t let a lot of light in being at the back of the house or whatever the case - If you want to take photos in there you will probably have to pull all the shades up, move the curtains back, and shoot before 4 p.m. so the sun isn’t too low.
If you're still learning how to use your DSLR - most of your shots are in automatic mode. Here's a tip: changing your ISO to a higher number helps when taking photos in low light. You can also change your shutter speed but if you haven’t gotten that far, experiment with your ISO. It’s amazing how much brighter your photos will be set at 800 than 200.
Note: "On my Canon I make sure my dial (the part where you choose portrait, landscape, up close, sports, or no flash settings, etc.) is set to AV, go to my menu, and then hit the ISO button on the top of my camera near the dial. This pulls up my ISO settings and I can choose how high or low. Low is better for bright, natural light such as outside on a sunny day and high is better for your dark rooms inside. You’re welcome."
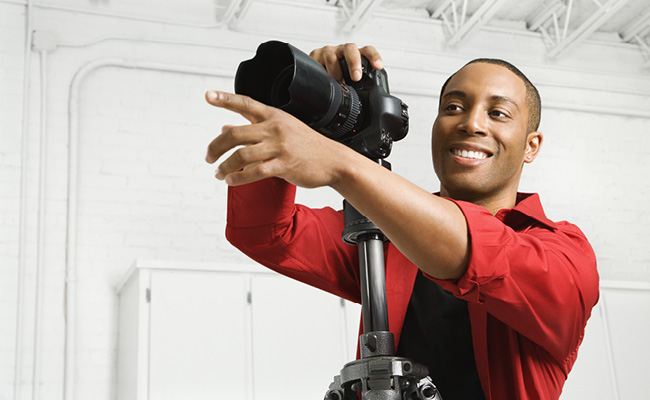
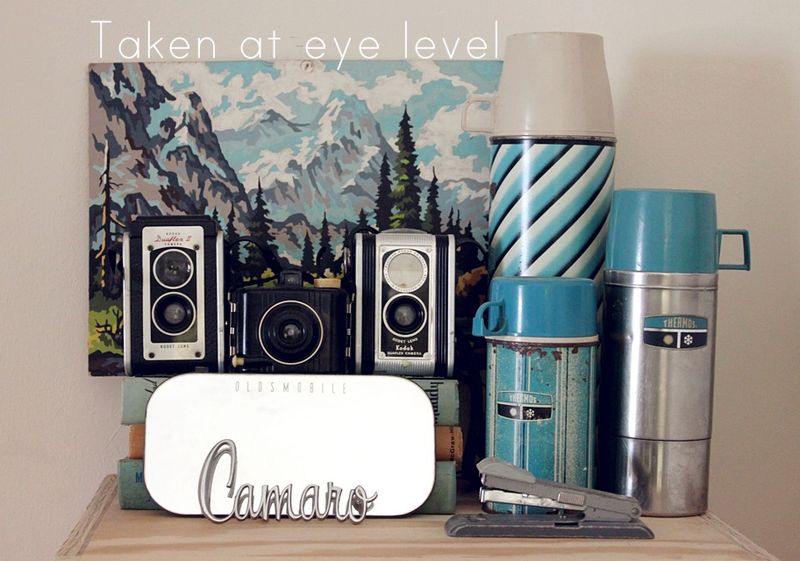
Tip #4 Bend over and watch out.
Unless you’re about 4′ 5″ you’re probably not taking photos of your space at an optimal angle. I had Brett (6’1″) take the photo above to show how different a vignette can look when you’re standing upright to how it can look when you’re at eye level (see below). When taking wider room shots, getting a bit lower can make your room look bigger and keep things focused on what’s interesting.


Watch out for mirrors or other reflective surfaces when shooting. Stand a little to one side or bend down enough that you’re shooting up at an angle. If you’re looking especially cute that day, disregard.

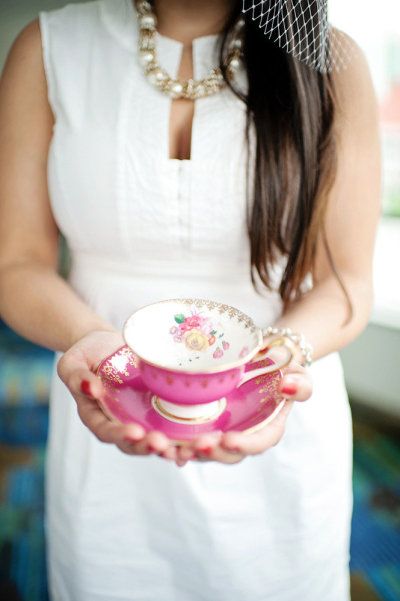
Tip #5 There’s a time to shoot wide and a time to shoot vignette.
When photographing a room take some wide shots that share a whole space, or chunks of a space that are well-defined, and then take some vignette shots. A vignette is a focused grouping such as the items on the top of the shelf above. You can tell it’s there in the first photo but it’s lost in space and I’m not really sharing anything else worthwhile. 
Whether you’re shooting wide shots or vignettes, try to avoid eye sores such as ceiling fans or cords. You can always edit out nail holes in Photoshop or another editing service. If you’re looking for something to start with, check out Picnik. It’s free and covers a lot of territory.

Your home is unique because it’s yours so think about your favorite elements as you plan your home tour. You may not be the only one in the world with a collection of vintage globes but the way you’ve displayed them may inspire someone. Your use of color in your living room may be exactly what another home owner was imagining for their space but couldn’t quite execute the first time around.
You’re out of excuses now! Pick a date to share your space online and then plan in time to get it tidied, shot, edited, and written up. I can’t wait to see!


Wednesday, August 28, 2013

Sand & Surf

We're headed down to the beach this weekend to photograph some surfing and we absolutely cannot wait! Not only is surfing and amazing and high skilled sport - it makes for some great action shots!

Do you photograph surfers in action? We would love to see what you can do and feature you on our blog! email you images to kayleigh_zettler@hotmail.com

We are really inspired by these photographs by: Jack English Photography
Tell us what you think!